

Picture this: a platter of grinning golden skulls lands on the Halloween table, and before anyone even asks what they are, one curious little ghoul cracks one open and that glorious stretch of melted mozzarella comes sliding out like something straight out of a spooky cartoon. That is the magic of Spooky Pizza Skulls — crispy pizza dough baked in a skull mold, stuffed to the brim with marinara, stretchy low-moisture mozzarella, and sassy little mini pepperonis. They look like a Halloween centerpiece and taste like your favorite pizza night, and the whole spooky show comes together in just 30 minutes. No fancy skills, no complicated decorating — just dough, filling, and a hot oven doing the heavy lifting. If your Halloween spread already stars our cheesy ghost pizza bagels, these skulls are the perfect creepy-cute sidekick to complete the party.

Recipe at a Glance
- Prep time: 12 minutes
- Cook time: 18 minutes
- Total time: 30 minutes
- Servings: 6 skulls (6 servings — 1 skull per person, or halve them for little hands)
- Course: Dinner / Halloween party food
Ingredients
- 1 lb (about 16 oz) refrigerated pizza dough, at room temperature
- 1/2 cup marinara sauce, plus extra warmed sauce for dunking
- 1 1/2 cups shredded low-moisture mozzarella cheese
- 1/2 cup mini pepperoni slices (about 30 pieces)
- 2 tablespoons olive oil
- 1 teaspoon Italian seasoning
- 1/4 teaspoon garlic powder
- Pinch of flaky sea salt
- Nonstick cooking spray or extra olive oil, for greasing the mold
- Equipment: one 6-cavity silicone skull mold

Directions
- Heat the oven. Position a rack in the center of the oven and preheat to 400°F (200°C). Grease every nook of the 6-cavity silicone skull mold generously with nonstick spray or olive oil — the eye sockets and teeth ridges love to grab.
- Shape the skull bases. Divide the room-temperature pizza dough into 6 equal portions (about 2.5 oz each). Roll each into a ball, then press and stretch each ball into a thin round about 5 inches across. Press one round firmly into each skull cavity, working the dough gently into the eye sockets, nose, and teeth ridges with your fingertips so the details imprint. Let the edges overhang the rim — they will become the lid.
- Fill them up. Spoon about 1 tablespoon of marinara into each dough-lined cavity. Add a generous pinch of shredded mozzarella (about 1/4 cup per skull) and 5 mini pepperoni slices. Do not overfill — leave a good 1/2 inch of clean dough border all around so you can seal it.
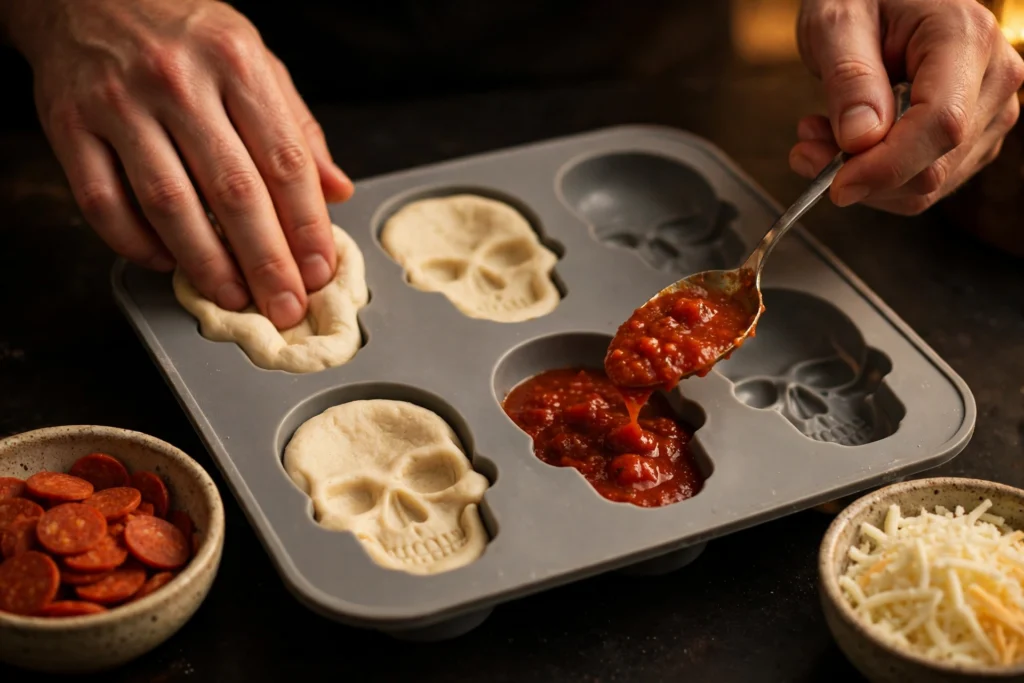
- Seal the lids. Fold the overhanging dough edges up and over the filling, pinching firmly where the edges meet so each skull is completely sealed. Pinch twice — a well-sealed lid traps the steam that melts the cheese and keeps the sauce from escaping. Brush the tops with olive oil and sprinkle with Italian seasoning, garlic powder, and a pinch of flaky sea salt.
- Bake until golden. Set the mold on a sturdy baking sheet and bake for 16 to 18 minutes, until the skulls are deeply golden brown and you can see tiny bubbles of cheese trying to peek through the seams. The crust should sound hollow when tapped.
- Rest, then unmold. This is the hardest part — wait 3 minutes before turning the mold over and gently pushing each skull out from the bottom. Resting lets the molten cheese set up just enough that the skulls hold their shape. Serve warm with a bowl of warmed marinara for dunking, alongside our festive spiderweb pizza for a full Halloween pizza spread.
Why This Method Works
Every step of this recipe earns its place. Here is the delicious science behind it:
400°F melts mozzarella without burning the crust
Four hundred degrees is the sweet spot where low-moisture mozzarella reaches its full melty, stretchy glory in about 15 minutes while the dough crisps to golden brown. Go much hotter and the thin dough ridges around the teeth char before the cheese inside fully melts; go cooler and the skulls steam instead of crisping.
Sealing the dough lid traps steam
That pinched-sealed lid is not just neatness — it creates a tiny steam chamber inside each skull. The steam from the marinara heats the cheese from every direction at once, so you get an even, lava-like melt instead of a cold pocket in the middle. It also locks the sauce in, which is what keeps the cheese from leaking out onto the pan.
Low-moisture mozzarella is the melt rule
Fresh mozzarella balls look dreamy but they are packed with water, which turns into a puddle inside a sealed skull and makes the crust soggy. Bagged low-moisture mozzarella has far less water, so it melts into that famous pizza cheese pull without watering down your filling. It is the same reason a classic pizza baked in a blazing hot oven stays crisp under all that cheese.
The 3-minute rest sets the shape
Straight out of the oven, the cheese inside is liquid and the skulls are fragile. Three minutes of resting lets the cheese firm up just enough that the skulls release from the mold with every creepy detail intact — teeth, sockets, and all.
Pro Tips
- Bring the dough to room temperature first. Cold dough springs back and fights you. Let the dough ball sit on the counter for 20 minutes before shaping and it will press into every skull detail like a dream.
- Press, do not stretch aggressively. Use your fingertips to coax the dough into the crevices. Yanking stretches it paper-thin, and thin spots tear and leak cheese.
- Oil the mold twice. One pass of spray, then go back and hit the eye sockets and teeth ridges again. Those details are where skulls stick.
- Warm the marinara for serving. A small bowl of warm marinara for dunking turns each skull into a two-bite experience — pair it with our spooky mummy pizza rolls on a big Halloween grazing board.
- Brush with garlic butter if you are feeling fancy. Melt 2 tablespoons of butter with a minced garlic clove and brush it over the hot skulls right after unmolding. Instant upgrade.
Common Mistakes (and How to Fix Them)
- Mistake: Cheese exploding out during baking. This is overfilling or a lazy seal. Fix: keep the filling at 1 tablespoon of sauce plus 1/4 cup of cheese per skull, and pinch the lid shut twice. If a little cheese escapes anyway, it crisps into a delicious cheese skirt — nobody will complain.
- Mistake: Skulls tearing when unmolded. They were unmolded too hot, or the mold was under-greased. Fix: wait the full 3 minutes, and if one sticks, run a thin butter knife gently around the edge before pushing from the bottom.
- Mistake: Soggy bottoms. Too much sauce, or fresh mozzarella instead of low-moisture. Fix: stick to 1 tablespoon of marinara per skull and use bagged shredded mozzarella only.
- Mistake: Skull details look blurry. The dough was pressed in too thickly over the features. Fix: press the dough thinner in the face area so it settles into the eye sockets and teeth ridges — the mold does the decorating for you.
Substitutions
- Dough: Homemade pizza dough, canned crescent roll dough, or even biscuit dough all work. Crescent dough bakes up flakier and needs about 2 minutes less in the oven — start checking at 14 minutes.
- Cheese: Swap mozzarella for shredded provolone, an Italian cheese blend, or pepper jack for a spicy kick.
- Fillings: Trade the pepperoni for cooked sausage crumbles, diced bell peppers, sliced mushrooms, or keep them vegetarian with extra cheese and a spoonful of pesto. Keep total filling volume the same so the lids still seal.
- Sauce: Alfredo sauce, pesto, or BBQ sauce all make fun flavor twists — just keep it to 1 tablespoon per skull.
Storage & Make-Ahead
To store: Cool leftover skulls completely, then refrigerate in an airtight container for up to 3 days. Reheat in a 375°F oven or air fryer for 5 to 7 minutes until the cheese is melty again — the microwave makes the crust rubbery, so skip it.
To freeze: Wrap baked and cooled skulls individually in foil, then freeze in a zip-top bag for up to 2 months. Reheat from frozen at 375°F for 12 to 15 minutes.
Make-ahead: Assemble the filled, sealed skulls in the mold up to 24 hours ahead, cover tightly with plastic wrap, and refrigerate. Bake straight from the fridge, adding 2 to 3 extra minutes. Food-safety note: do not leave the assembled skulls (or the shredded cheese) sitting at room temperature for more than 2 hours before baking or refrigerating.

Frequently Asked Questions
Do I need a skull mold to make spooky pizza skulls?
For the skull shape, yes — a 6-cavity silicone skull mold is what creates the creepy faces, and they are inexpensive and widely available online, especially in October. If you cannot find one, you can press the same filled dough rounds into a greased muffin tin for spooky pizza cups that taste identical, just without the skull faces.
Can I use store-bought pizza dough?
Absolutely — this recipe was built for it. A 16-ounce ball of refrigerated store-bought pizza dough is perfect for 6 skulls. Just let it rest at room temperature for about 20 minutes before shaping so it stretches easily and does not spring back out of the mold cavities.
Why did my pizza skulls leak cheese in the oven?
Leaking almost always means overfilling or an under-sealed lid. Keep the filling to 1 tablespoon of marinara and about 1/4 cup of shredded mozzarella per skull, leave a clean 1/2-inch dough border, and pinch the lid shut firmly — twice. Resting the baked skulls for 3 minutes before unmolding also keeps the molten cheese inside where it belongs.
How do I keep the skull details crisp and defined?
Three things make the biggest difference: grease the mold thoroughly (twice, especially the eye sockets and teeth ridges), press the dough thinly into every crevice with your fingertips instead of laying it thickly across the top, and do not skip the 3-minute rest before unmolding. A light brush of olive oil before baking also helps the details turn a deep, even golden brown.
Rate this recipe
Be the first to rate it!